From GitHub to a Live Next.js App
Your Next.js app runs perfectly on localhost. The code already lives in a GitHub repository. Now it needs to run in production, on a real domain, for real visitors.
You don’t need Vercel to deploy a Next.js app. Next.js is a Node.js app under the hood, and a compatible Next.js project can run on a Linux server with a supported Node.js environment. How to Deploy an App from GitHub to a VPS.
Here’s how to deploy a Next.js app from GitHub to a VPS in practice:
- Clone the repo onto a Linux VPS
- Install Node.js and dependencies
- Build the app for production
- Keep it running with PM2
- Put Nginx in front of it to handle the public domain and HTTPS
Key Takeaways: Deploy Next.js App From GitHub to VPS
- You can deploy a Next.js app from GitHub to a Linux VPS by cloning the repository, installing Node.js and dependencies, building the app for production, and starting it.
- Vercel isn’t required; a standard Node.js server or VPS can run a compatible Next.js application.
- A production Next.js app needs
npm run buildbefore it’s started withnpm start. - PM2 keeps a Next.js process alive after your SSH session closes, and restarts it after a crash or reboot.
- Nginx sits between the public domain and the app’s internal Node.js port, acting as a reverse proxy.
- GitHub Actions workflows can rerun the build automatically every time you commit and push to your main branch.
- A VPS gives you full control over the runtime and server; application hosting can take on some of that infrastructure work for you.
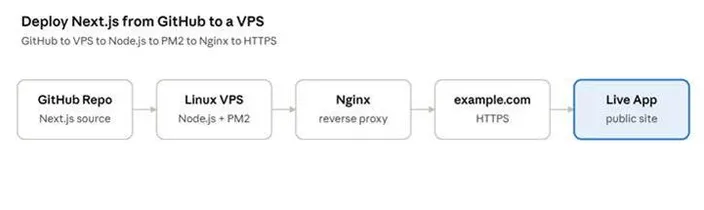
From GitHub repository to live website: the full Next.js deployment path
What You’ll Need
- A working Next.js project in a GitHub repository
- A Linux VPS (or suitable application hosting) with SSH access
- Git, Node.js, and npm on the server
- A domain, if the app needs to be publicly reachable
Step 1: Prepare Your VPS for Next.js
Connect over SSH:
ssh user@your-server-ipOnce you’re in, install Git and a Node.js version compatible with your project. Don’t assume a Node.js version. Check what your Next.js release and package.json actually require and match it, since newer Next.js versions generally expect a fairly recent Node.js LTS release.
Step 2: Clone the Next.js App from GitHub
git clone <repository-url>
cd <project-directory>
git clone copies your GitHub repository onto the VPS; cd moves into the project folder so later commands run in the right place.
| SECURITY TIP: If the repository is private, don’t paste a username and password into the clone URL. Set up an SSH key on the server and add it as a deploy key on GitHub, or use a short-lived personal access token if your workflow needs HTTPS. Either way, authenticate without hardcoding a secret you’ll reuse later. |
Step 3: Install Dependencies and Configure Environment Variables
npm ciOn a server, run npm ci rather than npm install. npm ci requires an existing package-lock.json. It deletes node_modules and reinstalls exactly what’s pinned in the lock file, which is faster and more predictable on a server than npm install. npm install can update the lock file itself. Use npm install only if there’s no lock file yet, or if you’re deliberately changing versions.
Next, set your production environment variables (API keys, database credentials, and anything else the app needs) in a .env file on the server itself. Never commit that file to GitHub. Next.js draws a firm line here. Ordinary environment variables stay server-side, while anything prefixed NEXT_PUBLIC_ gets bundled into the JavaScript sent to the browser.
| WARNING: Never put a secret behind a NEXT_PUBLIC_ variable. |
Also note that variables your app reads during the build need to be set before npm run build runs, not just before npm start.
Step 4: Build the Next.js App for Production
npm run build
npm start
next dev is for local development only. It’s slower and not meant for real traffic. npm run build compiles and optimises the app for production. npm start then runs the actual Next.js production server against that build.
COMMON MISTAKE:git pull only updates the source code on disk; it doesn’t rebuild anything. If you pull new commits and restart the app without rebuilding, you’re still serving the old version. Test the app on its internal port before putting Nginx in front of it, so you don’t mistake a real problem for a proxy issue. |
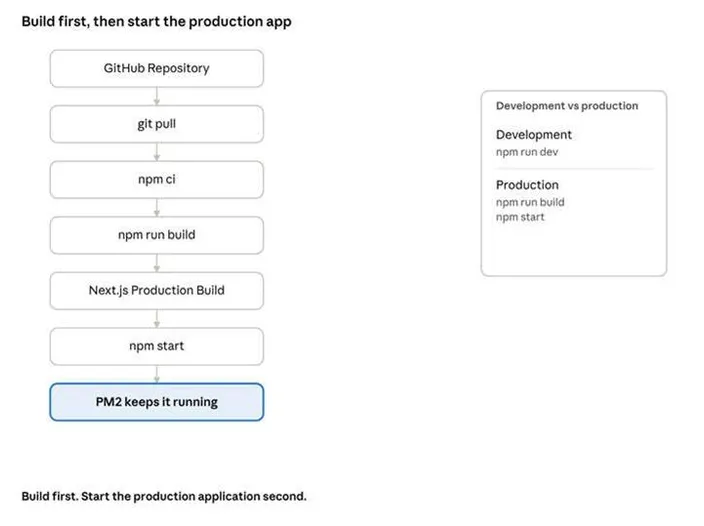
Build the app before you start it. PM2 keeps the production process running.
Step 5: Keep Next.js Running With PM2
Running npm start directly keeps the process attached to your terminal in most default setups, so closing the session can stop it too. PM2 solves this by running the process independently of your SSH session:
npm install -g pm2
pm2 start npm --name "nextjs-app" -- start
pm2 save
pm2 startup
QUICK TIP:pm2 start launches the app under PM2’s supervision, pm2 save remembers the process list, and pm2 startup relaunches it automatically after a server reboot. If the app crashes, PM2 restarts it. pm2 status and pm2 logs are the two commands you’ll reach for most when something looks wrong. |
Step 6: Configure Nginx as a Reverse Proxy
Visitors hit your domain, not your Node.js process directly:
Visitor → domain → Nginx → Next.js app (internal port, e.g., 3000)
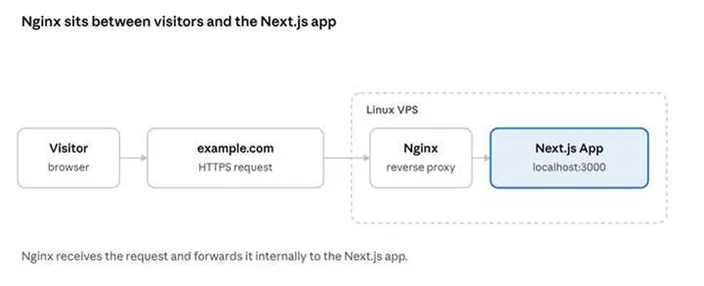
Nginx receives the request and forwards it internally to Next.js
A minimal server block:
server {
    listen 80;
    server_name example.com;

    location / {
        proxy_pass http://localhost:3000;
        proxy_http_version 1.1;
        proxy_set_header Upgrade $http_upgrade;
        proxy_set_header Connection 'upgrade';
        proxy_set_header Host $host;
        proxy_cache_bypass $http_upgrade;
    }
}
This configuration listens on plain HTTP (port 80) only, so it isn’t the final HTTPS setup yet. Nginx forwards requests internally to whatever port Next.js is listening on. That means you can restart or rebuild the app without visitors ever seeing a raw Node.js error. In Step 7, Certbot edits this same file automatically to add a matching HTTPS server block on port 443, so you don’t need to write that part by hand.
Step 7: Connect Your Domain and Enable HTTPS
Point your domain’s DNS A record at your VPS’s IP address, then reference that domain in the server_name line above. Once DNS has propagated, add HTTPS. Certbot’s Nginx plugin is the common route:
sudo certbot --nginx -d example.comTest the live domain in a browser, not just the internal port. For a deeper walkthrough, see HostAfrica’s SSL installation guide.
How Do You Update the Next.js App?
Once you commit and push your changes to GitHub, updating the live app is a short, repeatable process:
git pull
npm ci
npm run build
pm2 restart nextjs-app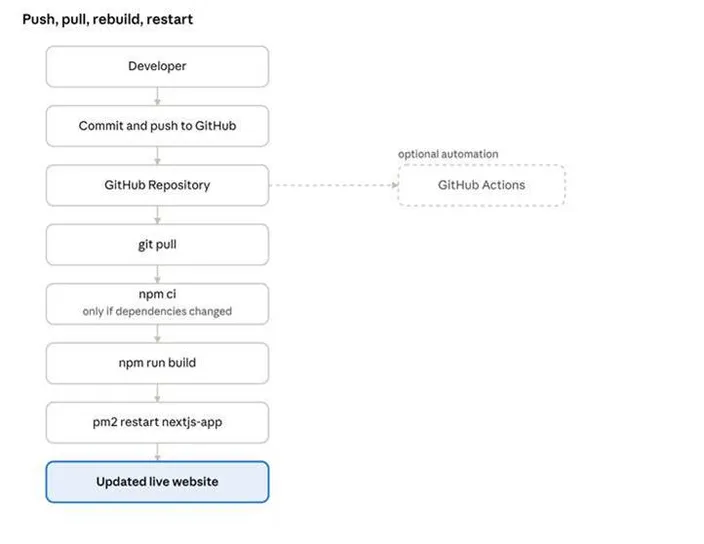
Push, pull, rebuild, restart, with GitHub Actions as an optional shortcut
If your latest changes don’t affect package.json or package-lock.json, you may not need to run npm ci again. The important step is to run npm run build after pulling application changes so Next.js creates a fresh production build.
Pulling new source code from GitHub is not the same as deploying it. A production Next.js app generally needs rebuilding before the new code is served. After the build completes, restart the PM2 process so it runs the newly built application.
For a larger team or a more automated setup, GitHub Actions workflows can handle this process for you. A typical workflow checks out the GitHub repository, sets up the required Node.js version, installs dependencies, runs the production build, and deploys the result to your VPS:
name: Deploy Next.js
on:
  push:
    branches: [main]
jobs:
  build:
    runs-on: ubuntu-latest
    steps:
      - name: Checkout
        uses: actions/checkout@v4
      - name: Setup Node
        uses: actions/setup-node@v4
        with:
          node-version: 22
      - name: Install dependencies
        run: npm ci
      - name: Build
        run: npm run build
Reading it from the top: the push and branches trigger starts the workflow whenever you push to main. The build job runs on ubuntu-latest, and its steps check out your code with actions/checkout@v4, then use actions/setup-node@v4 with a node-version that should match the version on your VPS. After that, the job installs dependencies and runs the build. Action version tags like @v4 move on over time, so check each action’s GitHub page for its current major version.
The remaining step, actually deploying that build to your VPS (typically over SSH), is what a dedicated GitHub Actions walkthrough would cover in full.
What About Docker or Static Next.js Sites?
Not every Next.js project fits this exact workflow. Some projects are configured as a static export: a static site with no Node.js server needed at runtime. To generate static files instead of running a server, set the output option in your next.config.ts:
ts
import type { NextConfig } from 'next'

const nextConfig: NextConfig = {
  output: 'export',
}

export default nextConfig
When you run npm run build, Next.js writes the finished site into an out folder. You can deploy that folder to static hosting such as GitHub Pages, Netlify, or a CDN instead of running it as a live process. Keep in mind that a static export drops anything that needs a server at request time, such as server-side rendering on each request.
If your site is deployed to GitHub Pages, the workflow above changes at the end. After the Build step, an upload step packages the out folder as an artifact, and a separate deploy job (using actions/deploy-pages) publishes it:
- name: Build
  run: npm run build
- name: Upload artifact
  uses: actions/upload-pages-artifact@v3
  with:
    path: ./out
Docker is another common production path. It packages the app and its dependencies into a container instead of installing Node.js directly on the VPS. Both are valid alternatives. This article covers the standard server-rendered Node.js deployment path, which is the most common starting point.
Common Next.js Deployment Problems
- Wrong Node.js version: check it against your
package.jsonengines field or your Next.js version’s requirements. If you use GitHub Actions, make sure the workflow’snode-versionmatches the server’s. - Missing environment variables, especially ones needed at build time, not just runtime.
- Forgetting
npm run build: runningnpm starton an unbuilt or stale build won’t serve your latest code. - Using
next devin production: it isn’t built for production traffic. - PM2 process not persisted: run
pm2 saveandpm2 startupso the app survives a reboot. - Nginx can’t reach the app: check that the port in your Nginx config matches the port Next.js is actually listening on.
- DNS not pointing to the VPS: confirm the A record resolves to your server before troubleshooting Nginx further.
- Stale build after
git pull: rebuild before restarting PM2.
FAQs: Deploy a Next.js App
Can I deploy Next.js without Vercel?
Yes. A compatible Next.js application runs on any server with Node.js installed, including a standard Linux VPS.
How do I deploy a Next.js app from GitHub?
Clone the repository onto your server and install dependencies. Then run npm run build, and start the app with npm start or, for production, under PM2.
Can Next.js run on a Linux VPS?
Yes. That’s the deployment path this article covers, using Node.js, PM2, and Nginx.
Do I need PM2 to run Next.js?
No, but without a process manager, the app stops when your SSH session ends and won’t restart automatically after a crash or reboot.
Can GitHub automatically deploy a Next.js app?
Yes. A GitHub Actions workflow can connect to your server and rerun the build-and-restart steps automatically. It’s a natural next step once the manual deployment works.
Can a Next.js site be deployed to GitHub Pages?
Only as a static site. Set output: 'export' in your Next.js config so the build generates static files, then publish the out folder with a GitHub Actions workflow. Features that need a live server won’t work there.
Conclusion
That’s the full path to deploy a Next.js app from GitHub to a VPS. GitHub stores the code, Node.js runs Next.js, and the production build prepares the app to serve real traffic. PM2 keeps it running, and Nginx makes it publicly reachable over your domain.
If you want full control over that stack, the Node.js version, and process management, a HostAfrica Linux VPS gives you a Linux server to run exactly this workflow on. If you’d rather run your application with less infrastructure to manage yourself, HostAfrica Application Hosting is worth a look too.